本記事では、AWS x Nuxt.js x Elasticsearchを用いた検索アプリケーションの開発環境の構築について、説明します。備忘録の側面が強いです。
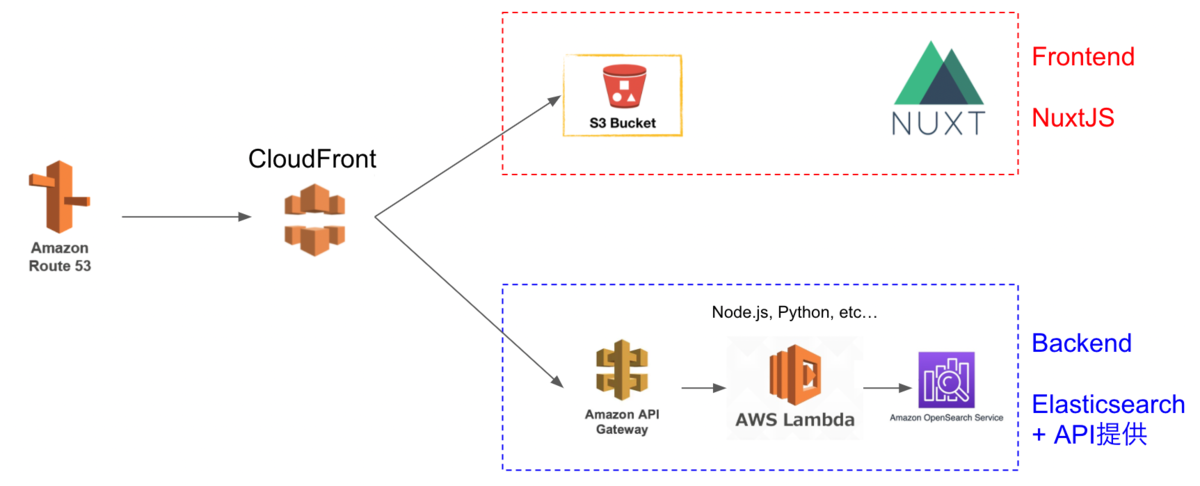
以下の構成を目指します。よりよい構成や構築方法があるかと思いますが、とりあえずAWSを用いて、検索エンジンにElasticsearchを使用したNuxt.js製のウェブアプリケーションの開発環境が整います。
Cultural Japanプロジェクトにおいても、上記とほぼ同様の構成を採用しています。
以下の流れで説明します。
準備(任意)
AWSでドメインの取得やSSL/TLS化を行う方法です。
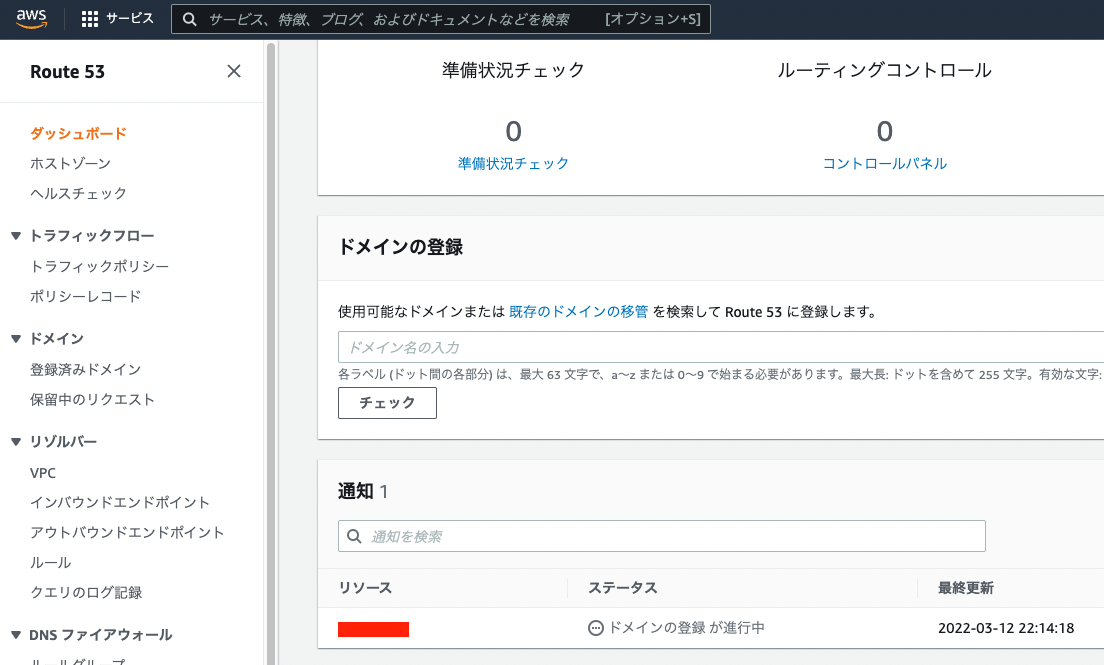
Route 53を用いたドメイン取得
独自ドメインの取得が必要な場合、Route 53でドメインの取得が可能です。
AWS Certificate Manager
次に、AWS Certificate Managerを用いて、SSL/TLS化を行います。こちらも手順に進めれば問題ありません。
なお、検証を行う際、以下の「Route 53でレコードを作成」ボタンをクリックして手続きすることで、簡単に進めることができました。

Backend
Backendの構築から進めます。
Identity and Access Management (IAM)ユーザの作成
まず、Amazon OpenSearch Serviceにアクセス権限があるユーザを作成します。

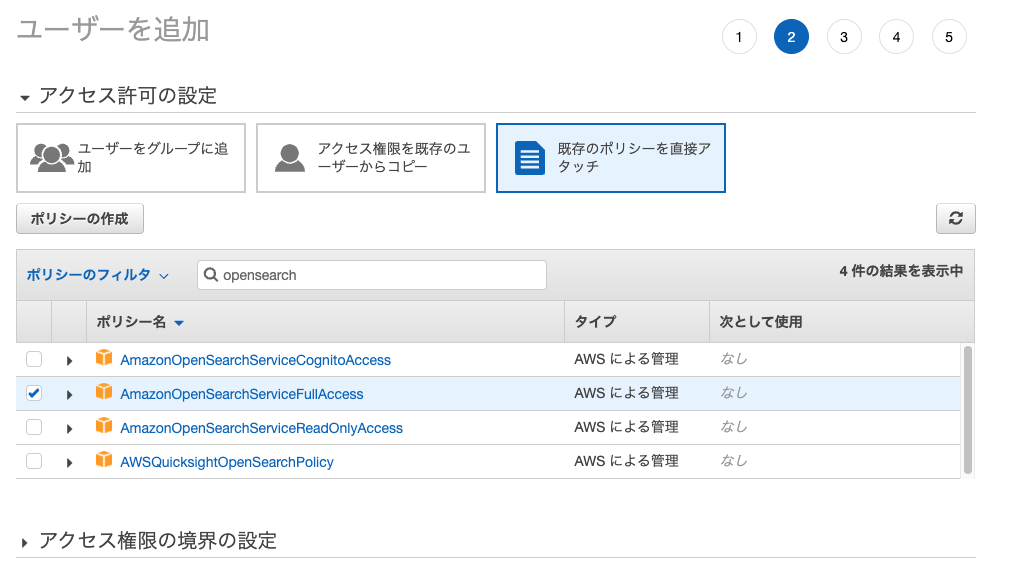
作成後に表示される「アクセスキー」と「シークレットアクセスキー」をメモしておきます。
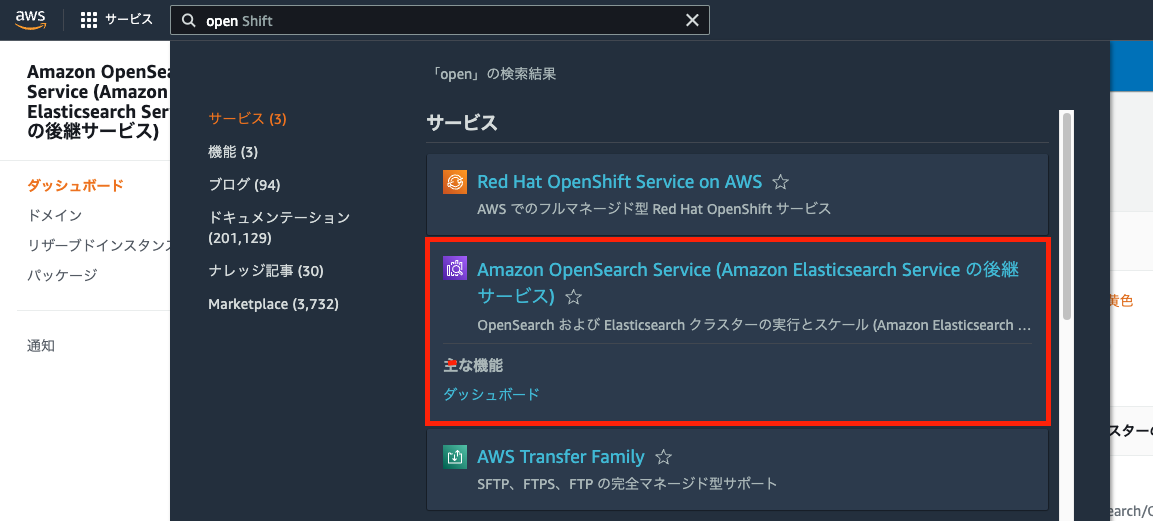
Amazon OpenSearch Service
まず、Amazon OpenSearch Serviceを選びます。
その後は、以下のチュートリアルが参考になります。
https://docs.aws.amazon.com/opensearch-service/latest/developerguide/gsg.html
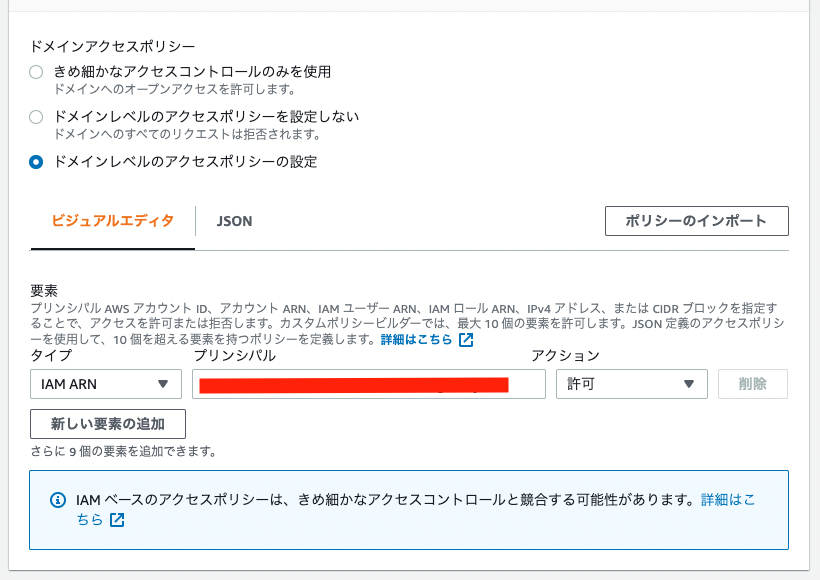
上記のマニュアルからの変更点として、アクセスポリシーは「ドメインレベルのアクセスポリシーの設定」を選択し、先に作成したユーザのARNを許可してください。
(ローカル)Pythonを用いたAmazon OpenSearch Serviceへのデータ登録
次に、上記で発行した「アクセスキー」と「シークレットアクセスキー」などを用いて、Amazon OpenSearch Serviceにデータ登録を行います。
具体的には、以下のGoogle Colabなどを参考にしてください。
https://colab.research.google.com/drive/1-uygvtQwoc3Wn4XSEUWN5Z5Hxq3vT9Gj?usp=sharing
AWS SAM(Serverless Application Model)
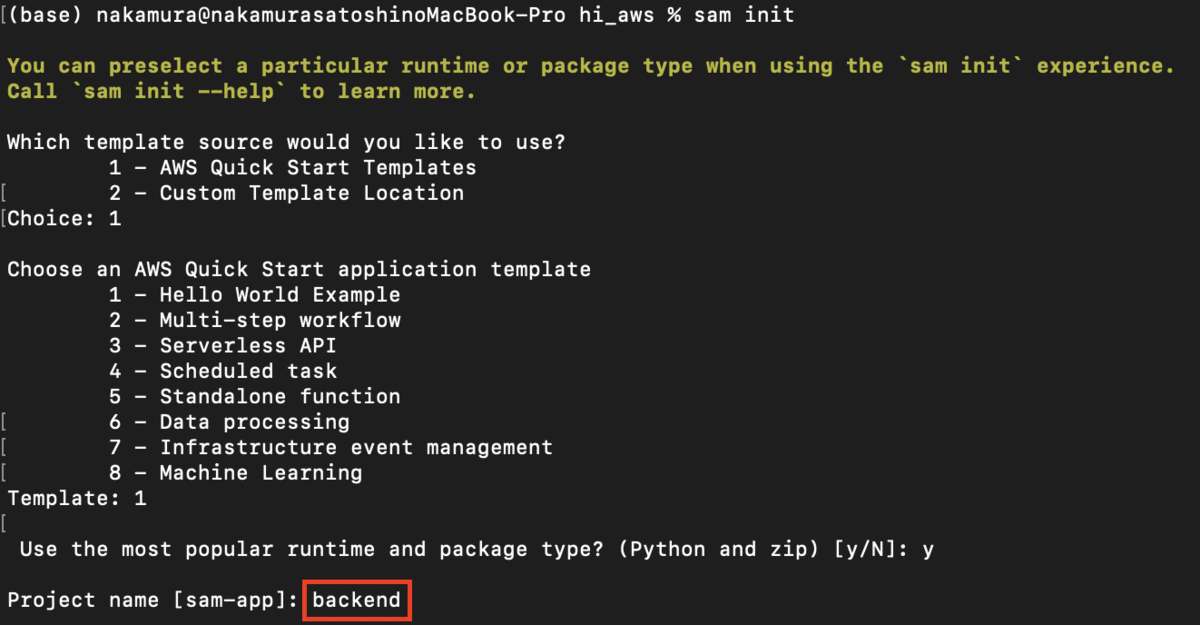
次に、API GatewayとLambda 関数を作成します。具体的には、以下の記事を参考に、AWS SAM(Serverless Application Model)を利用します。
以下は、ローカル環境での作業です。sam initの際、プロジェクト名をbackendに設定しました。
そして、template.yamlファイルを以下のように変更しました。
AWSTemplateFormatVersion: "2010-09-09"
Transform: AWS::Serverless-2016-10-31
Description: >
  backend

  Sample SAM Template for backend

# More info about Globals: https://github.com/awslabs/serverless-application-model/blob/master/docs/globals.rst
Globals:
  Function:
    Timeout: 20  Resources:
  SearchFunction:
    Type: AWS::Serverless::Function # More info about Function Resource: https://github.com/awslabs/serverless-application-model/blob/master/versions/2016-10-31.md#awsserverlessfunction
    Properties:
      CodeUri: search/
      Handler: app.lambda_handler
      Runtime: python3.9
      Architectures:
        - x86_64
      Events:
        Search:
          Type: Api # More info about API Event Source: https://github.com/awslabs/serverless-application-model/blob/master/versions/2016-10-31.md#api
          Properties:
            Path: /search
            Method: get
            RequestParameters:
              "method.request.path.str":
                Required: true
                Caching: false
      Environment:
        Variables:
          PARAM1: VALUE

Outputs:
  # ServerlessRestApi is an implicit API created out of Events key under Serverless::Function
  # Find out more about other implicit resources you can reference within SAM
  # https://github.com/awslabs/serverless-application-model/blob/master/docs/internals/generated_resources.rst#api
  SearchApi:
    Description: "API Gateway endpoint URL for Prod stage for Search function"
    Value: !Sub "https://${ServerlessRestApi}.execute-api.${AWS::Region}.amazonaws.com/Prod/search/"
  SearchFunction:
    Description: "Search Lambda Function ARN"
    Value: !GetAtt SearchFunction.Arn
  SearchFunctionIamRole:
    Description: "Implicit IAM Role created for Search function"
    Value: !GetAtt SearchFunctionRole.Arn
Getパラメータを取得できるように設定しており、以下の記事を参考にしました。また、Timeoutが発生したので、デフォルトの3から20に変更しています。
https://xp-cloud.jp/blog/2020/10/15/8936/
そして、/search/app.py を以下のように作成します。
import json
import requests
from requests_aws4auth import AWS4Auth

# import requests

region = 'us-east-1' # For example, us-west-1
service = 'es'

access_key = "aaa"
secret_key = "bbb"

awsauth = AWS4Auth(access_key, secret_key, region, service)

host = 'https://xxx.us-east-1.es.amazonaws.com' # The OpenSearch domain endpoint with https://
index = 'hi-gallery'
url = host + '/' + index + '/_search'


def lambda_handler(event, context):
    query = {
        "size": 25,
        "query": {
            "multi_match": {
                "query": event['queryStringParameters']['q'],
                # "fields": ["title^4", "plot^2", "actors", "directors"]
            }
        }
    }

    # Elasticsearch 6.x requires an explicit Content-Type header
    headers = { "Content-Type": "application/json" }

    # Make the signed HTTP request
    r = requests.get(url, auth=awsauth, headers=headers, data=json.dumps(query))

    # Create the response and add some extra content to support CORS
    response = {
        "statusCode": 200,
        "headers": {
            "Access-Control-Allow-Origin": '*'
        },
        "isBase64Encoded": False
    }

    # Add the search results to the response
    response['body'] = r.text

    return response
上記のようにファイルを準備した上で、以下を実行します。
sam build
sam local start-api -p 3003
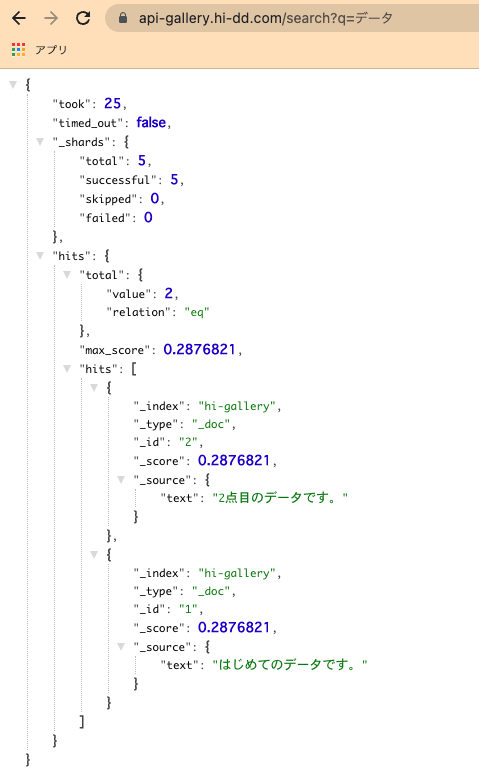
その後、以下のようなURLから、先に用意したOpenSearchへ検索できることを確認できます。なお、Dockerが動いている必要がある点にご注意ください。

この後、deployを行います。
その前に、認証情報を設定ファイルに保存しておいてください。
そして、以下を実行します。
sam deploy –guided
無事に完了すると、s3、API Gateway、Lambda関数、にそれぞれファイルがアップロード&設定が反映されます。
例えば、API Gatewayにアクセスすると、以下のように、APIが作成されています。

ここで作成したAPIに対して、カスタムドメインを設定します。
API Gatewayでカスタムドメインを設定後、発行されるcloudfrontのURLをRoute 53に登録することで、独自ドメインの設定が完了します。
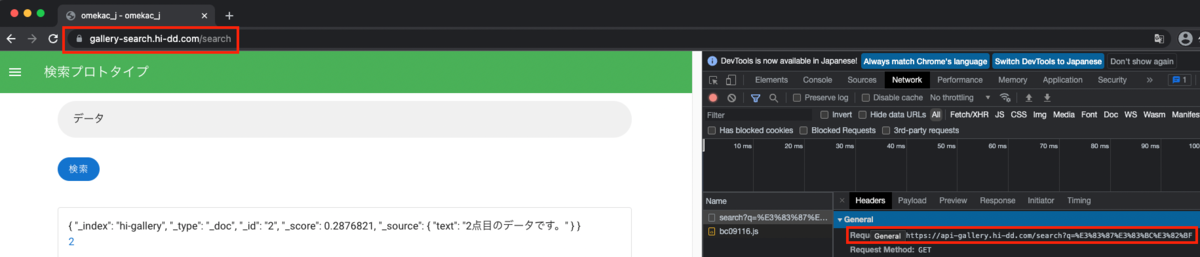
この結果、以下のような独自ドメインを使って、Elasticsearch(Open Search)の検索結果を得ることができます。
これでBackendの環境構築は一旦完了です。
Frontend
フロントエンドの開発には、Nuxt.jsを用います。インストールや利用の方法は、たくさんの記事が既に存在しますので、そちらを参考にしてください。
なお、dotenvを用いて、開発環境と本番環境でアクセスするAPIサーバを変更しています。
開発がひと段落したところで、デプロイを行います。ここでは、GitHub Actionsを用います。具体的には、以下を用いました。
name: deploy to s3

on:
  push:
    branches:
      - main

jobs:
  build:
    runs-on: ubuntu-latest
    timeout-minutes: 5

    steps:
      - name: Checkout
        uses: actions/checkout@v2

      - name: setup node
        uses: actions/setup-node@v1
        with:
          node-version: '12.x'

      - name: Configure AWS credentials
        uses: aws-actions/configure-aws-credentials@v1
        with:
          aws-access-key-id: ${{ secrets.AWS_ACCESS_KEY_ID }}
          aws-secret-access-key: ${{ secrets.AWS_SECRET_ACCESS_KEY }}
          aws-region: us-east-1

      - name: Cache dependencies
        uses: actions/cache@v1
        with:
          path: ~/.npm
          key: ${{ runner.os }}-node-${{ hashFiles('**/package-lock.json') }}
          restore-keys: |
            ${{ runner.os }}-node-
      - name: Install packages
        run: npm ci

      - name: Genarate files
        run: npm run generate

      - name: Upload dist files to S3
        env:
          S3_BUCKET_NAME: ${{ secrets.S3_BUCKET_NAME }}
        run: aws s3 sync ./dist s3://$S3_BUCKET_NAME/ --quiet

      - name: make invalidation to cloudfront
        uses: chetan/invalidate-cloudfront-action@master
        env:
          DISTRIBUTION: ${{ secrets.DISTRIBUTION_MAIN }}
          PATHS: '/*'
          AWS_REGION: 'us-east-1'
          AWS_ACCESS_KEY_ID: ${{ secrets.AWS_ACCESS_KEY_ID }}
          AWS_SECRET_ACCESS_KEY: ${{ secrets.AWS_SECRET_ACCESS_KEY }}

      - name: Slack Notification on Success
        if: success()
        uses: rtCamp/action-slack-notify@v2.0.2
        env:
          SLACK_WEBHOOK: ${{ secrets.SLACK_WEBHOOK }}
          SLACK_TITLE: Deploy Success(Develop)
          SLACK_COLOR: good

      - name: Slack Notification on Failure
        uses: rtCamp/action-slack-notify@v2.0.2
        if: failure()
        env:
          SLACK_WEBHOOK: ${{ secrets.SLACK_WEBHOOK }}
          SLACK_TITLE: Deploy Failure(Develop)
          SLACK_COLOR: danger
cloudfrontのinvalidationや、slackへの通知も行います。
上記に関連して、s3のバケット作成と、そのバケットをオリジンドメインとするcloudfrontのディストリビューションを作成します。
その際、デフォルトルートオブジェクトを「index.html」に設定します。
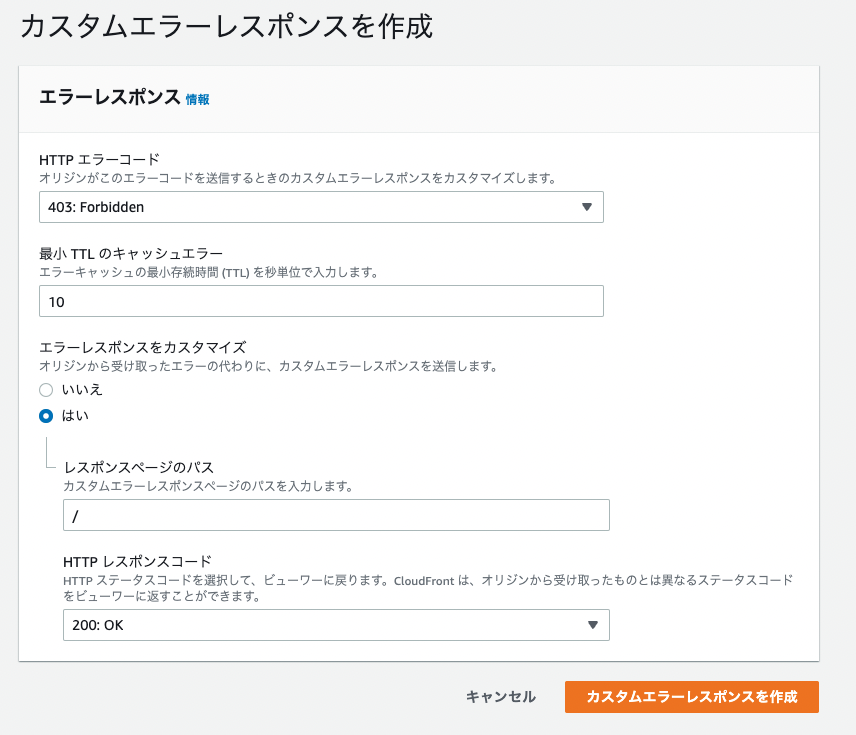
また、カスタムエラーレスポンスを以下のように設定します。
ここで発行されるcloudfrontのURLをRoute 53に設定することで、カスタムドメインからFrontendにもアクセスできるようになります。
この結果、以下のように、それぞれカスタムドメインを使用した上で、FrontendからBackendへ検索できることを確認しました。
まとめ
説明を省いてる部分も多く、わかりにくい点が多々あるかと思いますが、どのようなサービスをどのような手順で使用するか、といった観点で参考になる部分があれば幸いです。